You’ve chosen hybrid flooring for its durability and water resistance, but now comes the big question: can you tackle the hybrid flooring install yourself, or should you call in a pro? The good news is that hybrid flooring is one of the most DIY-friendly options available, thanks to its click-lock system and forgiving nature. With the right preparation and technique, most homeowners can achieve professional-looking results and save $25–$45 per square metre in labour costs.
What’s in this guide
- Tools and materials you’ll need
- Preparation and subfloor requirements
- Step-by-step hybrid flooring install process
- Cost breakdown for DIY vs professional
- Common mistakes to avoid
- FAQ
Tools and materials you’ll need
Before starting your hybrid flooring install, gather everything you’ll need. Having the right tools on hand prevents frustrating mid-project trips to the hardware store and ensures a smoother installation process.
Essential tools:
- Tape measure and pencil
- Utility knife or vinyl plank cutter
- Jigsaw or circular saw for cutting around obstacles
- Tapping block and pull bar (often included with flooring purchase)
- Rubber mallet
- Spacers (typically 10mm for expansion gaps)
- Spirit level (minimum 1200mm)
- Notched trowel (if using adhesive method)
Materials required:
- Hybrid flooring planks (order 10% extra for cuts and wastage)
- Underlay (check manufacturer specs—some hybrid flooring has integrated underlay)
- Transition strips and scotia/quarter round for finishing
- Floor levelling compound if needed
- Moisture barrier or vapour barrier for concrete subfloors
Most hybrid flooring products use a click-lock installation method, which means you won’t need adhesive for the primary installation. However, you may need construction adhesive for securing transition strips and trim. If you’re looking at different flooring types, check out our comprehensive hybrid flooring guide to understand the material better before installation.
Preparation and subfloor requirements
Proper preparation is the difference between a hybrid flooring install that lasts decades and one that develops problems within months. Hybrid flooring is remarkably forgiving compared to traditional timber, but it still requires a clean, level, and dry subfloor.
Subfloor assessment
Your existing subfloor must be structurally sound, clean, and level within 3mm over 3 metres. Use your spirit level to check for dips and high spots. Any deviation beyond this tolerance will cause planks to separate over time or create hollow-sounding areas underfoot.
For concrete subfloors, conduct a moisture test. Tape a plastic sheet (around 1m²) to the concrete and leave it for 24–48 hours. If moisture accumulates underneath, you’ll need a moisture barrier. According to the Australian Building Codes Board, proper moisture management is essential for flooring longevity, particularly in humid climates like Queensland and coastal New South Wales.
Timber subfloors should be checked for loose boards, protruding nails, and structural integrity. Fix any squeaks or movement before proceeding. If you’re working over existing vinyl or tiles, ensure they’re firmly adhered—loose tiles must be removed or properly secured.
Floor levelling
If your subfloor has dips or bumps beyond the 3mm tolerance, use a self-levelling compound. These products are readily available at Bunnings or Mitre 10 and cost roughly $35–$65 per 20kg bag, covering approximately 4–6 square metres at 3mm thickness. Mix according to manufacturer instructions and allow proper curing time—rushing this step is one of the most common hybrid flooring install mistakes.
Acclimatisation
Store your hybrid flooring planks in the room where they’ll be installed for at least 48 hours before beginning work. Maintain room temperature between 18–28°C during this period. While hybrid flooring is more dimensionally stable than traditional timber, acclimatisation ensures the planks adjust to your home’s specific conditions, reducing the risk of expansion or contraction post-installation.
Step-by-step hybrid flooring install process
With preparation complete, you’re ready to begin the actual hybrid flooring install. Work methodically and don’t rush—most DIY installations take 1–2 days for an average-sized room (20–30m²).
1. Install underlay (if required)
If your hybrid flooring doesn’t have integrated underlay, roll out your moisture barrier or foam underlay perpendicular to the direction you’ll lay planks. Overlap seams by 50mm and tape them together. Trim underlay flush with walls.
2. Plan your layout
Measure the room width and divide by the plank width to determine how many rows you’ll need. If your final row will be narrower than 50mm, adjust your starting row width—cutting both the first and last rows creates a more balanced look. Always run planks parallel to the longest wall or the room’s primary light source for the best visual effect.
3. Establish the expansion gap
Place 10mm spacers along the starting wall. Hybrid flooring needs room to expand and contract with temperature and humidity changes. This gap will be covered by skirting boards or scotia, so don’t skip it—a lack of expansion gap is a primary cause of buckling.
4. Install the first row
Start in the left corner, placing the first plank with its tongue side facing the wall (you may need to cut the tongue off). Click the next plank end-to-end, tapping gently with your rubber mallet and tapping block. Continue the first row to the far wall, cutting the last plank to fit while maintaining the 10mm expansion gap. If the offcut is longer than 300mm, use it to start the second row—this staggers seams and creates a more natural appearance.
5. Continue with subsequent rows
For the second row, angle the long edge of the plank into the previous row’s groove at approximately 25–30 degrees, then lower it flat until you hear a click. Work along the entire row before moving to the next. Stagger end joints by at least 300mm between rows—most installers aim for random staggering that looks natural rather than a repeating pattern.
Every few rows, check that your installation remains square using a carpenter’s square or the 3-4-5 triangle method. It’s easier to make small corrections early than to fix a skewed installation later.
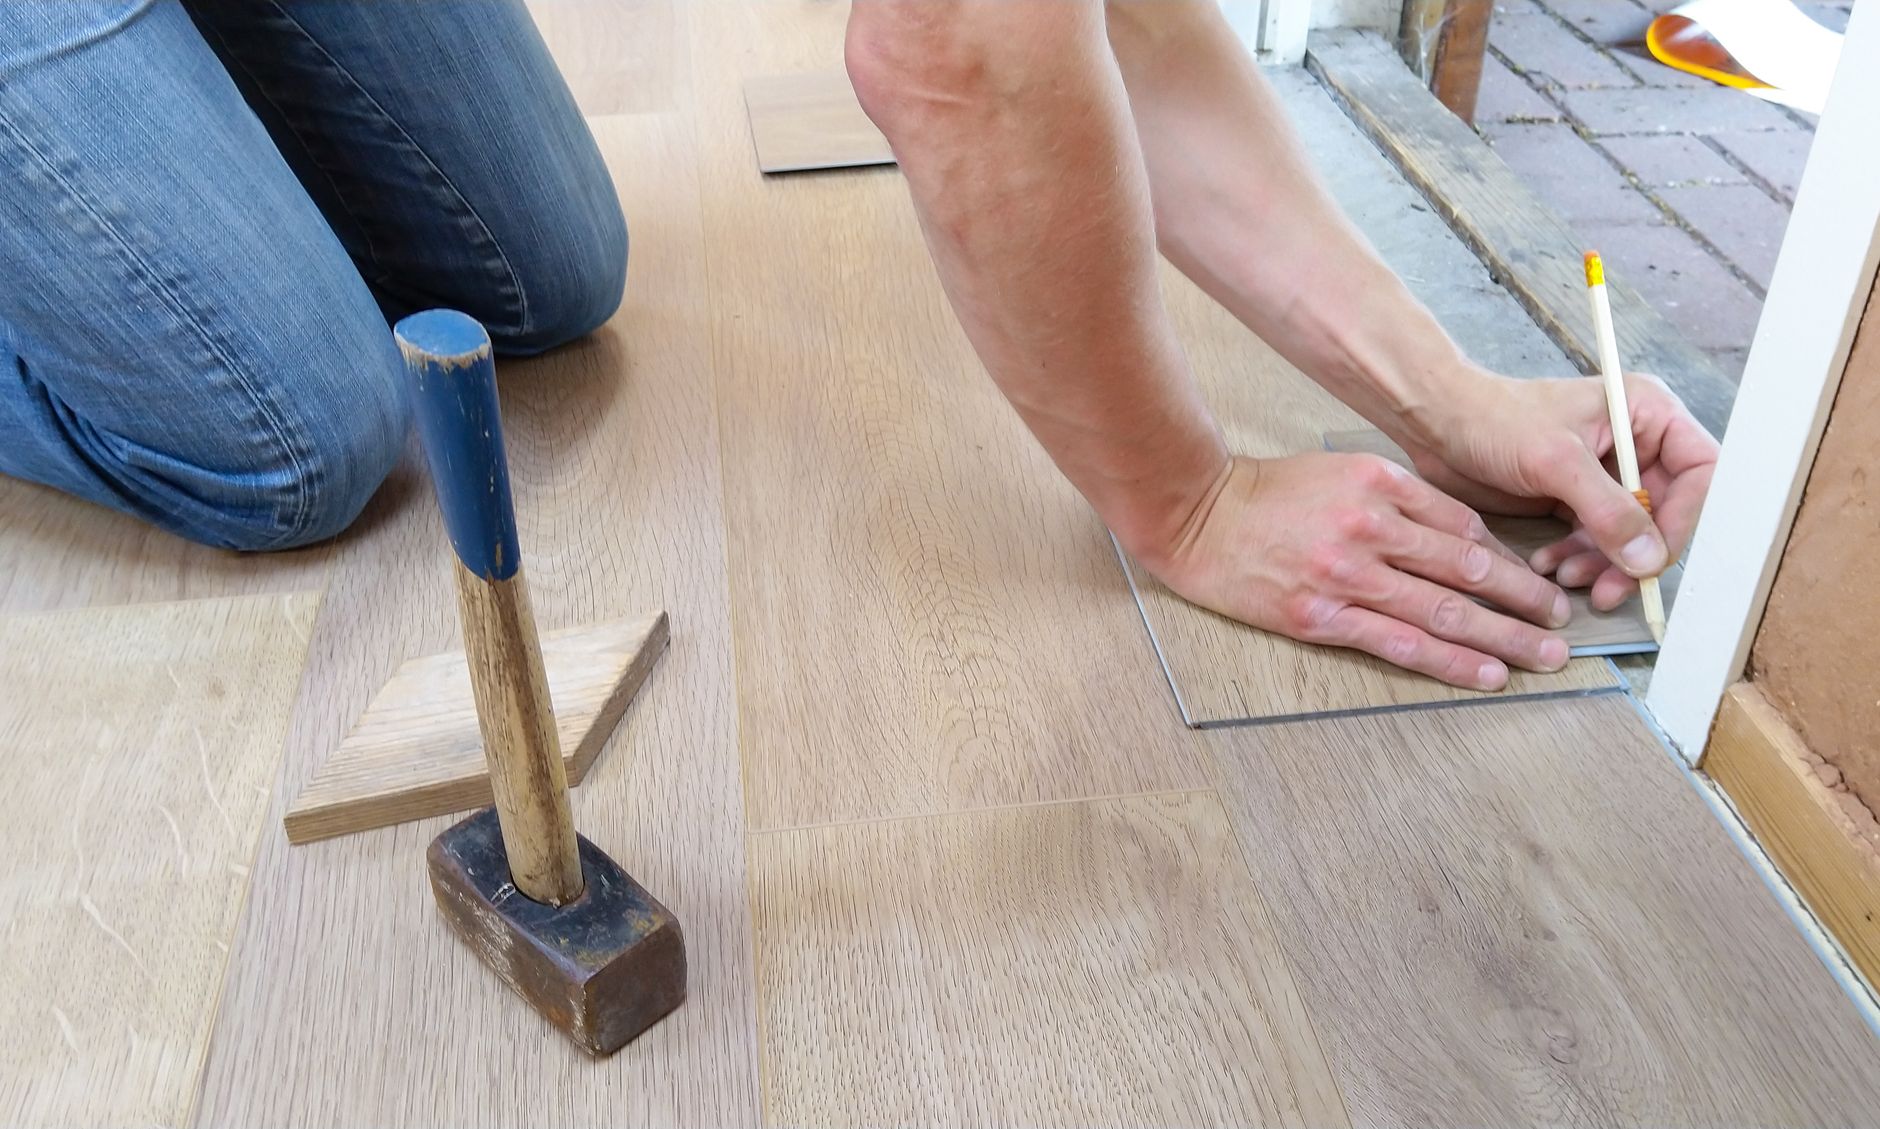
6. Cutting around obstacles
For door frames and architraves, use a jamb saw or flush-cut saw to undercut the timber by the thickness of your flooring plus underlay. Slide planks beneath the cut frame for a clean finish. For pipes and irregular obstacles, create a cardboard template first, then transfer measurements to your plank. Cut carefully with a jigsaw, remembering to maintain your 10mm expansion gap around all fixed objects.
7. Final row and finishing
The final row often requires ripping planks lengthwise. Measure carefully at multiple points along the wall (walls are rarely perfectly straight), then cut planks to fit. Use your pull bar to click the final row into place—you won’t have room to tap from above.
Once all planks are installed, remove spacers and install transition strips at doorways and scotia or quarter round along walls to cover expansion gaps. Your hybrid flooring install is now complete.
Cost breakdown for DIY vs professional
Understanding the cost implications helps you decide whether to DIY your hybrid flooring install or hire a professional.
DIY costs for a 30m² room:
- Hybrid flooring planks: $1,200–$2,100 ($40–$70/m²)
- Underlay (if needed): $90–$180 ($3–$6/m²)
- Levelling compound: $70–$140
- Transition strips and trim: $80–$150
- Tool hire (if needed): $50–$100
- Total: $1,490–$2,670
Professional installation for the same room:
- Materials (as above): $1,440–$2,570
- Labour: $750–$1,350 ($25–$45/m²)
- Total: $2,190–$3,920
DIY installation saves roughly $700–$1,250 on a typical room. For an entire home (100m²), savings can reach $2,500–$4,500. However, factor in your time commitment (typically 2–3 days for a first-timer), confidence level, and the importance of getting it perfect. Professional installers typically complete a 30m² room in 4–6 hours and provide workmanship warranties.
According to data from the Australian Bureau of Statistics, DIY home improvement has increased significantly, with hybrid flooring install being one of the most popular projects due to its relatively straightforward process and substantial cost savings.
Common mistakes to avoid
Even experienced DIYers can make errors during a hybrid flooring install. Avoiding these pitfalls ensures a professional result:
Skipping subfloor preparation: Trying to lay flooring over an uneven, dirty, or damp subfloor causes 80% of installation failures. Take the extra day to properly prepare—it’s worth it.
Forgetting expansion gaps: Omitting the 10mm gap around all perimeter walls and fixed objects leads to buckling when the floor expands. This is especially critical in Australian homes with significant seasonal temperature swings.
Poor seam staggering: End joints closer than 300mm create weak points and an obvious pattern. Maintain random staggering throughout your hybrid flooring install for both structural integrity and aesthetics.
Forcing planks together: If planks don’t click easily, don’t force them. Check for debris in the groove, verify you’re angling correctly, and ensure your subfloor is level. Forced connections often separate over time.
Inadequate acclimatisation: Installing planks straight from the car boot or garage can lead to expansion issues. Always acclimatise for at least 48 hours in the actual installation environment.
Wrong direction in wet areas: In bathrooms and laundries, run planks perpendicular to the likely direction of water flow. This minimises water penetration at seams. While hybrid flooring is water-resistant, it’s not waterproof at the seams.
Ignoring transitions: Rooms larger than 10 metres in any direction, or areas exposed to significantly different conditions (like between indoor and outdoor spaces), need expansion joints and transition strips. Ignoring this causes stress cracks and separation.
FAQ
How long does a hybrid flooring install take?
For a DIY installation, expect 1–2 days for a standard room (20–30m²) including preparation. Your first room will take longer as you develop technique—subsequent rooms go much faster. Professional installers complete the same space in 4–6 hours. An entire home (100m²) typically takes 3–5 days for DIY or 2–3 days for professionals, depending on room complexity and obstacles.
Can I install hybrid flooring over tiles or existing vinyl?
Yes, provided the existing floor is firmly adhered, level, clean, and in good condition. Loose tiles must be removed or re-secured. Fill grout lines deeper than 3mm with levelling compound. Remove any wax or polish from vinyl. If tiles are uneven or damaged, it’s better to remove them entirely—a poor substrate compromises your entire hybrid flooring install.
Do I need underlay for hybrid flooring?
It depends on the product. Many modern hybrid flooring options come with integrated underlay attached to the backing, eliminating this step. Check your manufacturer’s specifications. If underlay isn’t integrated, you’ll need a 2–3mm foam underlay for timber subfloors or a moisture barrier plus underlay for concrete. Never double-up underlay—this creates an unstable surface.
What’s the best way to cut hybrid flooring?
For straight cuts, a vinyl plank cutter (around $40–$80 from Bunnings) provides clean, quick cuts without dust. Alternatively, score deeply with a utility knife and snap the plank. For curved cuts or complex shapes, use a jigsaw with a fine-tooth blade. A circular saw works for ripping planks lengthwise. Always cut with the decorative side up to prevent chipping.
How soon can I walk on newly installed hybrid flooring?
You can walk on floating hybrid flooring (click-lock installation) immediately after completion—no curing time required. However, wait 24–48 hours before moving heavy furniture back in or placing rugs, allowing the floor to settle fully. If you’ve used adhesive for any part of your hybrid flooring install, follow the adhesive manufacturer’s curing recommendations, typically 12–24 hours.
Can hybrid flooring be installed in bathrooms and wet areas?
Yes, hybrid flooring is water-resistant and suitable for bathrooms, laundries, and kitchens. However, it’s not 100% waterproof at the seams. Wipe up standing water promptly and consider using silicone sealant along the perimeter in very wet areas like bathrooms. Ensure proper expansion gaps are maintained—water damage often occurs when floors are installed too tightly and water becomes trapped underneath.
Ready to transform your space
A hybrid flooring install is one of the most rewarding DIY renovation projects you can tackle. With proper preparation, the right tools, and attention to detail, you’ll achieve professional results while saving thousands in labour costs. Remember that the key to success lies in the preparation phase—invest time in getting your subfloor perfect, maintain consistent expansion gaps, and don’t rush the process. Whether you’re renovating a single room or your entire home, hybrid flooring offers durability, water resistance, and stunning aesthetics that will serve you well for decades. Take your time, follow the manufacturer’s specific guidelines for your chosen product, and enjoy the satisfaction of a beautifully installed floor you completed yourself.
Related guides
For more on Australian renovation costs, see: